Fully Connected Neural Network
Let’s build a neural network library from scratch. I mean why not?
You may say : Pff… Big deal.. With Python and Numpy it’s just a matter of hours. What if I told you that i will use C++. Nah I’m kidding. I am going to use C.
The reason for that is that i want to train my network on GPU and GPUs don’t understand Python, not even C++. My plan is to use OpenCL along with C++ to build a fully functional library to create your own Neural Network and train it. And to spice it up a little , why not implementing a convolutional neural netwok instead of a simple, boring Fully Connected NN. But first things first.
Let’s not dive immediately on GPU’s kernel code. First we should build our library skeleton.
OpenCL::initialize_OpenCL();
std::vector<std::vector<float> > inputs, targets;
std::vector<std::vector<float> > testinputs;
std::vector<float> testtargets;
ConvNN m_nn;
std::vector<int> netVec;
netVec = { 1024,10 };
m_nn.createFullyConnectedNN(netVec, 1, 32);
m_nn.trainFCNN(inputs, targets, testinputs, testtargets, 50000);
m_nn.trainingAccuracy(testinputs, testtargets, 2000, 1);
Ok thats the ordinary process of every machine learning pipeline with the difference that instead of Sklearn or Tensorflow functions, here we have C++. Quite the accomplishment! Right?
So far so good. We have the baseline of our software. Now it is time to develop the actual structure of a neural network. The basic entity of any NN is the Node and many nodes stacked together form a layer. There you have it:
Node and Layer
typedef struct Node {
int numberOfWeights;
float weights[1200];
float output;
float delta;
}Node;
typedef struct Layer {
int numOfNodes;
Node nodes[1200];
}Layer;
Since this is plain C, we can’t use an std::vector and we need plain C because the above code will be compiled and executed by the actual GPU. But we’re getting there. Please note that a better way than an array with predefined length would be to malloc the necessary space in memory every time, but that is for some other time.
We build our basic structures for the Node and the Layer so it is time to program the actual Network, which is simply a stack of layers.
Neural Network
h_netVec = newNetVec;
Layer *inputLayer = layer(h_netVec[0], 0);
h_layers.push_back(*inputLayer);
for (unsigned int i = 1; i <h_netVec.size(); i++)
{
Layer *hidlayer = layer(h_netVec[i], h_netVec[i - 1]);
h_layers.push_back(*hidlayer);
}
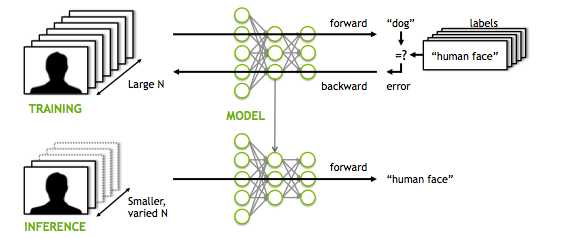
There it is. Our simple Neural network written in C++. In fact, it is nothing more than a vector of layers, with each layer being a vector of Nodes. You may think that our job is done here. Haha! We are not even close. We have to train our network with actual data. This is the time where OpenCL is coming into play.
Those vectors can not be accesed by the GPU so we have to transform them into another structure called Buffer, a basic element of OpenCL. But the logic is exactly the same as before.
OpenCL Buffers
d_InputBuffer = cl::Buffer(OpenCL::clcontext, CL_MEM_READ_WRITE, sizeof(float)*inpdim*inpdim);
tempbuf = cl::Buffer(OpenCL::clcontext, CL_MEM_READ_WRITE, sizeof(Node)*h_layers[0].numOfNodes);
(OpenCL::clqueue).enqueueWriteBuffer(tempbuf,CL_TRUE,0,sizeof(Node)*h_layers[0].numOfNodes,h_layers[0].nodes);
d_layersBuffers.push_back(tempbuf);
for (int i = 1; i<h_layers.size(); i++) {
tempbuf = cl::Buffer(OpenCL::clcontext, CL_MEM_READ_WRITE, sizeof(Node)*h_layers[i].numOfNodes);
(OpenCL::clqueue).enqueueWriteBuffer(tempbuf, CL_TRUE,0, sizeof(Node)*h_layers[i].numOfNodes, h_layers[i].nodes);
d_layersBuffers.push_back(tempbuf);
}
Don’t get confused by all those “cl::” , “clqueue” and “context”. Those are OpenCL stuff. The logic remains intangible.
Before we dive into the exciting part ,we have to one more thing. We have to define the OpenCL Kernels. The kernels are the acual code that is executed by the GPU.
We need 3 kernels in total:
- One for the forward propagation
- One for the backward propagation in the output layer
- One for the backward in the hiddens layer
Kernel
compoutKern = cl::Kernel(OpenCL::clprogram, "compout");
backpropoutKern = cl::Kernel(OpenCL::clprogram, "backpropout");
bakckprophidKern = cl::Kernel(OpenCL::clprogram, "backprophid");
You guessed it. It is GPU’s turn. I am not goint to get into many details about how OpenCL works and how GPU process the data, but there are some things to remember:
- GPU’s have many many cores and that’s why they are suitable for parallelization
- We consides that each core runs the code for a single Node of the layer
- When the layer computations is completed , we procced to the next layer and so on.
Backpropagation
Keep those in mind we can now understand easily the next snippet:
kernel void compout( global Node* nodes,global Node * prevnodes,int softflag)
{
const int n = get_global_size(0);
const int i = get_global_id(0);
float t = 0;
for ( int j = 0; j < nodes[i].numberOfWeights; j++)
t += nodes[i].weights[j] * prevnodes[j].output;
t+=0.1;
nodes[i].output =sigmoid(t);
}
And for the backward propagation we have:
kernel void backprophid(global Node* nodes,global Node * prevnodes,global Node *nextnodes,int nextnumNodes,float a)
{
const int n = get_global_size(0);
const int i = get_global_id(0);
float delta = 0;
for (int j = 0; j !=nextnumNodes; j++)
delta += nextnodes[j].delta * nextnodes[j].weights[i];
delta *= devsigmoid(nodes[i].output);break;
nodes[i].delta = delta;
for (int j = 0; j != nodes[i].numberOfWeights; j++)
nodes[i].weights[j] -= a*delta*prevnodes[j].output;
}
kernel void backpropout(global Node* nodes,global Node * prevnodes,global float* targets,float a,int softflag )
{
const int n = get_global_size(0);
const int i = get_global_id(0);
float delta=0;
delta = (nodes[i].output-targets[i])*devsigmoid(nodes[i].output);
for (int j = 0; j !=nodes[i].numberOfWeights; j++)
nodes[i].weights[j] -= a*delta*prevnodes[j].output;
nodes[i].delta=delta;
}
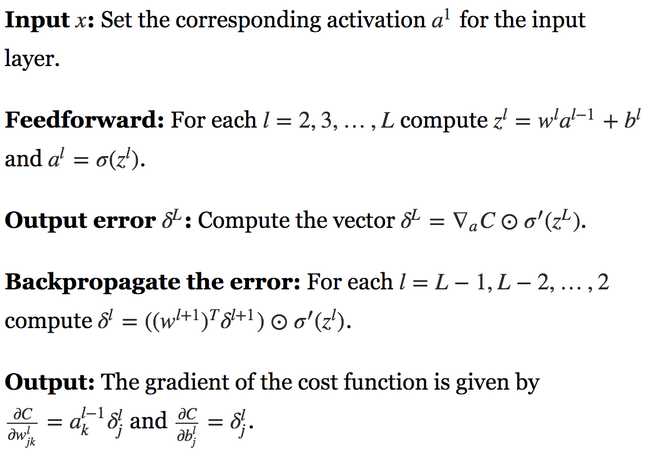
If you feel lost let me remind you the equations for the back propagation algorithm:
Now it all makes sense right?
Well that’s it. All we have to do is fed our data and run the kernels . I don’t know if you realised it but we are done. We just build our Neura network completely from scratch and train them in GPU.
For the full code please visit my github repository: Neural netwok library
In the next part we’ll extend the library to include Convolutional Neural Networks. Stay tuned…
* Disclosure: Please note that some of the links above might be affiliate links, and at no additional cost to you, we will earn a commission if you decide to make a purchase after clicking through.


