Self-driving cars will be without a doubt the standard way of transportation in
the future. Major companies from Uber and Google to Toyota and General Motors
are willing to spend millions of dollars to make them a reality, as the future
market is predicted to worth trillions. In the past years, we have seen an
enormous evolution in the area with cars from Uber, Tesla, Waymo to have a total
of 8 million miles in their records.
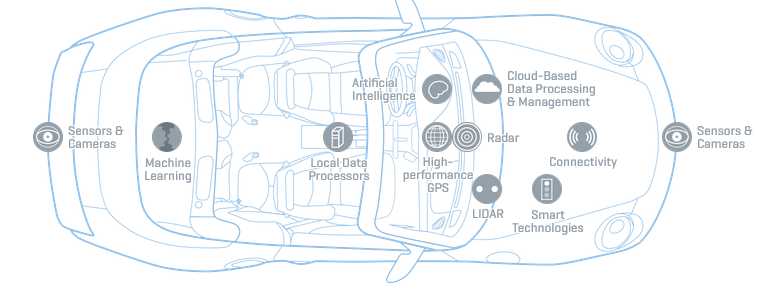
Of course, self-driving cars are now a reality due to many different
technological advancements both in hardware and in software (Spoiler alert: it’s Deep Learning). LIDAR sensors,
cameras, GPS, ultrasonic sensors are working together to receive data from every
possible source. Those data are analyzed in real time using advanced algorithms,
making the autopilot functionality possible.

Steps to program an Autonomous vehicle
There are 5 essential steps to form the self-driving pipeline with the following
order:
-
Localization
-
Perception
-
Prediction
-
Planning
-
Control
Localization is basically how an autonomous vehicle knows exactly where it
is in the world. In this step, they get the data from all the
above-mentioned sensors (sensor fusion) and use a technique called Kalman
filters to find their position with the highest possible accuracy. Kalman
filter is a probabilistic
method that use measurements over time to estimate the state of the object’s
position. Another widely used technique is particle
filters.
Perception is how cars sense and understand their environment. Here is where
computer vision and neural networks come into play. But more on that later.
In the prediction step, cars predict the behavior of every object (vehicle
or human) in their surroundings. How they will move, in which direction, at
which speed, what trajectory they will follow. One of the most common modes
used here is a recurrent neural network, as it can learn from past behavior
and forecast the future.
Path planning is self-explainable. It is where that car plans the route to
follow or in other words generates its trajectory. This is accomplished with
search algorithms (like
A*), Lattice planning
and Reinforcement Learning.
Finally, control engineers take it from here. They use the trajectory
generated in the previous step to change accordingly the steering,
acceleration and breaks of the car. The most common method is
PID Control but there are a
few others such as Linear quadratic regulator(LQR)
and Model predictive control(MPC)
By the way, if you want to learn more check the two awesome courses offered
by Udacity for free:
Well, I think it’s now time to build an autonomous car by ourselves. Ok, not all
of it. But what we can do is use a driving simulator and record what the camera
sees. Then we can feed those frames into a neural network and hopefully the car
might be able to learn how to drive on its own. Let’s see…
We will use Udacity’s open sourced Self-Driving Car
Simulator. To use it, you need
to install Unity game engine. Now the fun part:

It goes without saying that I spend about an hour recording the frames. It was
some serious work guys. I was not fooling around.
Anyway, now the simulator has produced 1551 frames from 3 different angles and
also logged the steering angle, the speed, the throttle and the break for each
of the different 517 states.
Before we build the model in keras, we have to read the data and split them into
the training and test sets.
Build a Self Driving Car
def load_data():
data_df = pd.read_csv(os.path.join(os.getcwd(),data_dir, 'driving_log.csv'), names=['center', 'left', 'right', 'steering', 'throttle', 'reverse', 'speed'])
X = data_df[['center', 'left', 'right']].values
y = data_df['steering'].values
X_train, X_test, y_train, y_test = train_test_split(X, y, test_size=0.2, random_state=0)
return X_train, X_test, y_train, y_test
After that, we will build our model which has 5 Convolutional, one Dropout and 4
Dense layers.
def build_model():
model = Sequential()
model.add(Lambda(lambda x: x/127.5-1.0, input_shape=INPUT_SHAPE))
model.add(Conv2D(24, kernel_size=(5, 5),strides=(2,2) ,activation='elu'))
model.add(Conv2D(36, kernel_size=(5, 5),strides=(2,2) ,activation='elu'))
model.add(Conv2D(48, kernel_size=(5, 5),strides=(2,2),activation='elu'))
model.add(Conv2D(64, kernel_size=(3, 3), activation='elu'))
model.add(Conv2D(64, kernel_size=(3, 3), activation='elu'))
model.add(Dropout(0.5))
model.add(Flatten())
model.add(Dense(100, activation='elu'))
model.add(Dense(50, activation='elu'))
model.add(Dense(10, activation='elu'))
model.add(Dense(1))
return model
The network will output only one value, the steering angle.
Before we pass the inputs on the model, we should do a little preprocessing. Note that this is done with OpenCV, an open-sourced library that is build for image and video manipulation.
First of all we have to produce more data and we will do that by augment our existing. We can for example flip the existing images, translate them, add random shadow or change their brightness.
image, steering_angle = choose_image(data_dir, center, left, right, steering_angle)
image, steering_angle = random_flip(image, steering_angle)
image, steering_angle = random_translate(image, steering_angle, range_x, range_y)
image = random_shadow(image)
image = random_brightness(image)
Next, we have to make sure to crop and resize the images in order to fit into our network.
def preprocess(image):
image = crop(image)
image = resize(image)
image = rgb2yuv(image)
return image
Training time:
def train_model(model, X_train, X_valid, y_train, y_valid):
model.compile(loss='mean_squared_error', optimizer=Adam(lr=0.001))
model.fit_generator(batch_generator(data_dir, X_train, y_train, batch_size, True),
steps_per_epoch,
num_epochs,
verbose=1,
validation_data=batch_generator(data_dir, X_valid, y_valid, batch_size, False),
validation_steps=40
)
Now we have the trained model. It has essentially cloned our driving behavior.
Let’s see how we did it. To do that, we need a simple server (socketio server)
to send the model prediction to the simulator in real-time. I am not going to
get into many details about the server stuff. What’s important is the part that
we predict the steering angle using the frames and logs generated by the
simulator in real time.
steering_angle = float(data["steering_angle"])
throttle = float(data["throttle"])
speed = float(data["speed"])
image = Image.open(BytesIO(base64.b64decode(data["image"])))
image = np.asarray(image)
image = preprocess_data.preprocess(image)
image = np.array([image])
steering_angle = float(model.predict(image, batch_size=1))
throttle = 1.0 - steering_angle ** 2 - (speed / speed_limit) ** 2
send_control(steering_angle, throttle)
And the result:
Not bad. Not bad at all.
We actually did it. I think that Udacity’s emulator is the easiest way for someone to start learning about self-driving vehicles. To continue your journey on Autonomous vehicles, I recommend the Self-Driving Cars Specialization by Coursera. It contains everything you need to get started if you are really interested in the field.
To wrap up, autonomous cars have already started being mainstream and there is no doubt that they become commonplace sooner than most of us think. It is extremely complex to build one as it requires so many different components from sensors to software. Deep Learning will definetely play a big role towards this goal. But here we just did a very very small first step.
The major thing is that the future is here. And it is exciting…

* Disclosure: Please note that some of the links above might be affiliate links, and at no additional cost to you, we will earn a commission if you decide to make a purchase after clicking through.